
 Beck’s Toolbox
 Knives
 DIY Build Kits
 Digital Downloads
 Machine Accessories
 Fabricating Materials
CNC Plasma Cutting
How Amperage, Cut Speed, and Tip Size Work Together in CNC Plasma Cutting
Sep
How Amperage, Cut Speed, and Tip Size Work Together in CNC Plasma Cutting
A plasma cutter has a lot of settings, but three of the most important are closely connected:
- Amperage
- Cutting speed
- Tip size
The mistake is treating them as three independent settings.
They are a system.
If you change amperage without considering the tip or travel speed, cut quality can get worse even though you are using more power. Likewise, slowing the machine down does not automatically make a better cut.
Understanding how these three variables work together makes troubleshooting a CNC plasma table much easier.
Amperage Determines How Much Energy Is Available
Amperage controls the amount of electrical current being delivered through the plasma arc.
In general, thicker material requires more amperage because more energy is needed to penetrate and remove the material.
But there is an important distinction:
More amperage is not automatically better.
Using significantly more amperage than necessary can create:
- A wider kerf
- More heat input
- More material distortion
- Faster consumable wear
- Reduced detail on small features
For thin material, a lower-amperage setup can often produce a narrower, cleaner cut than simply running the plasma cutter at maximum output.
The Tip Has to Match the Amperage
The plasma tip—or nozzle—is designed to operate within a particular amperage range.
The small opening in the tip constricts the plasma arc and controls its shape.
That means the tip size and amperage need to work together.
Running too much current through a small-amperage tip can quickly damage the orifice. Once that opening starts eroding, the arc becomes less controlled.
That can show up as:
- Increased bevel
- Wider kerf
- Poor dimensional accuracy
- Rougher cut edges
- Inconsistent arc direction
On the other hand, using a much larger tip than necessary can produce a less concentrated arc than a properly matched lower-amperage setup.
The goal is not simply selecting the biggest consumable available.
It is selecting the correct consumable for the amperage and material being cut.
Cutting Speed Controls How Long the Arc Stays in One Place
Once amperage and tip size are established, travel speed becomes extremely important.
Think about the plasma arc as a concentrated heat source moving across the material.
Move too slowly and you dump excessive heat into the cut.
Move too quickly and the arc cannot completely remove the material before the torch moves forward.
If You Cut Too Slowly
Common symptoms include:
- Wider kerf
- Excessive heat
- More warping
- Heavy low-speed dross
- Rounded or washed-out features
Very slow cutting can actually make a part look worse even though it seems logical that giving the plasma cutter more time should improve penetration.
If You Cut Too Fast
You may see:
- Heavy dross
- Incomplete penetration
- Excessive bevel
- Arc lag behind the torch
- Rough cut surfaces
At extreme speeds, the torch may simply fail to cut completely through the material.
Amperage and Speed Have to Balance
This is where CNC plasma setup becomes easier to understand.
If you increase amperage, you can generally support a faster cutting speed.
If you reduce amperage, the machine generally needs to travel slower.
That relationship is why a manufacturer’s cut chart should be treated as a complete set of settings rather than a list of unrelated numbers.
For example, you should not take the amperage from one row and combine it with the cutting speed from another because they happen to look reasonable.
The amperage, tip, speed, and material thickness were intended to work together.
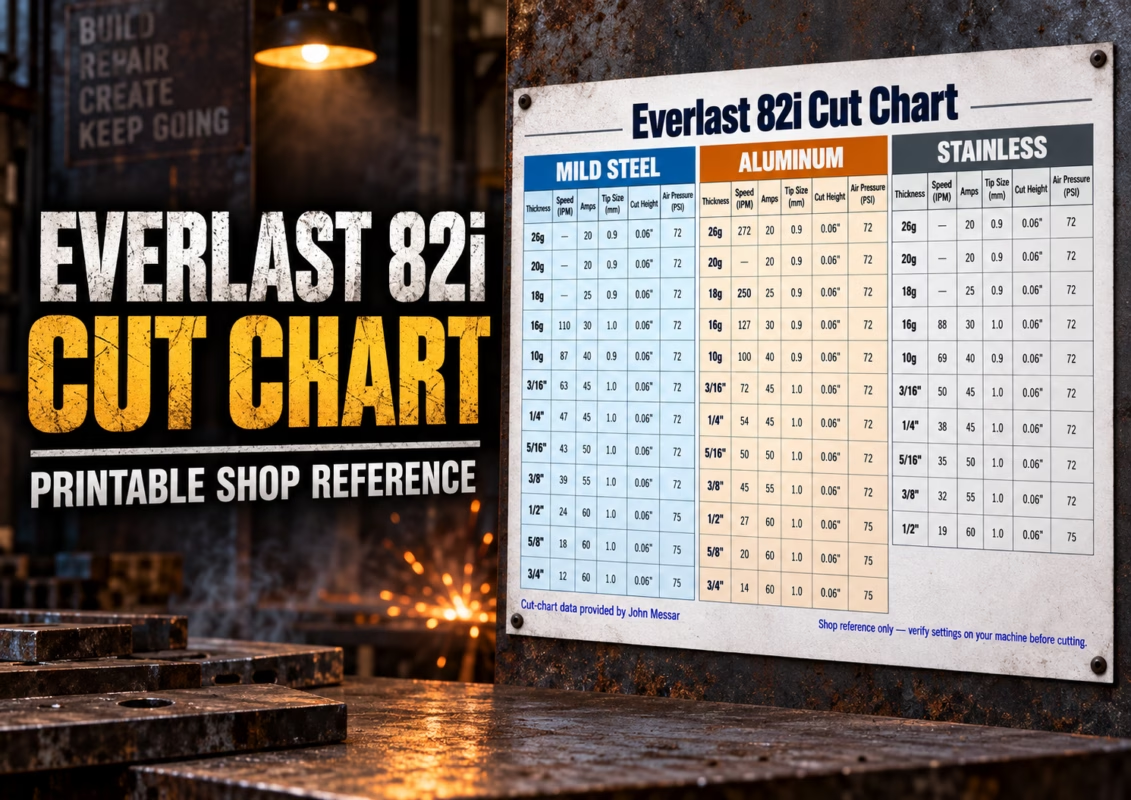
Special thanks to John Messar for providing the Everlast 82i cut-chart data used as reference material for this CNC plasma article series.
Start With the Cut Chart
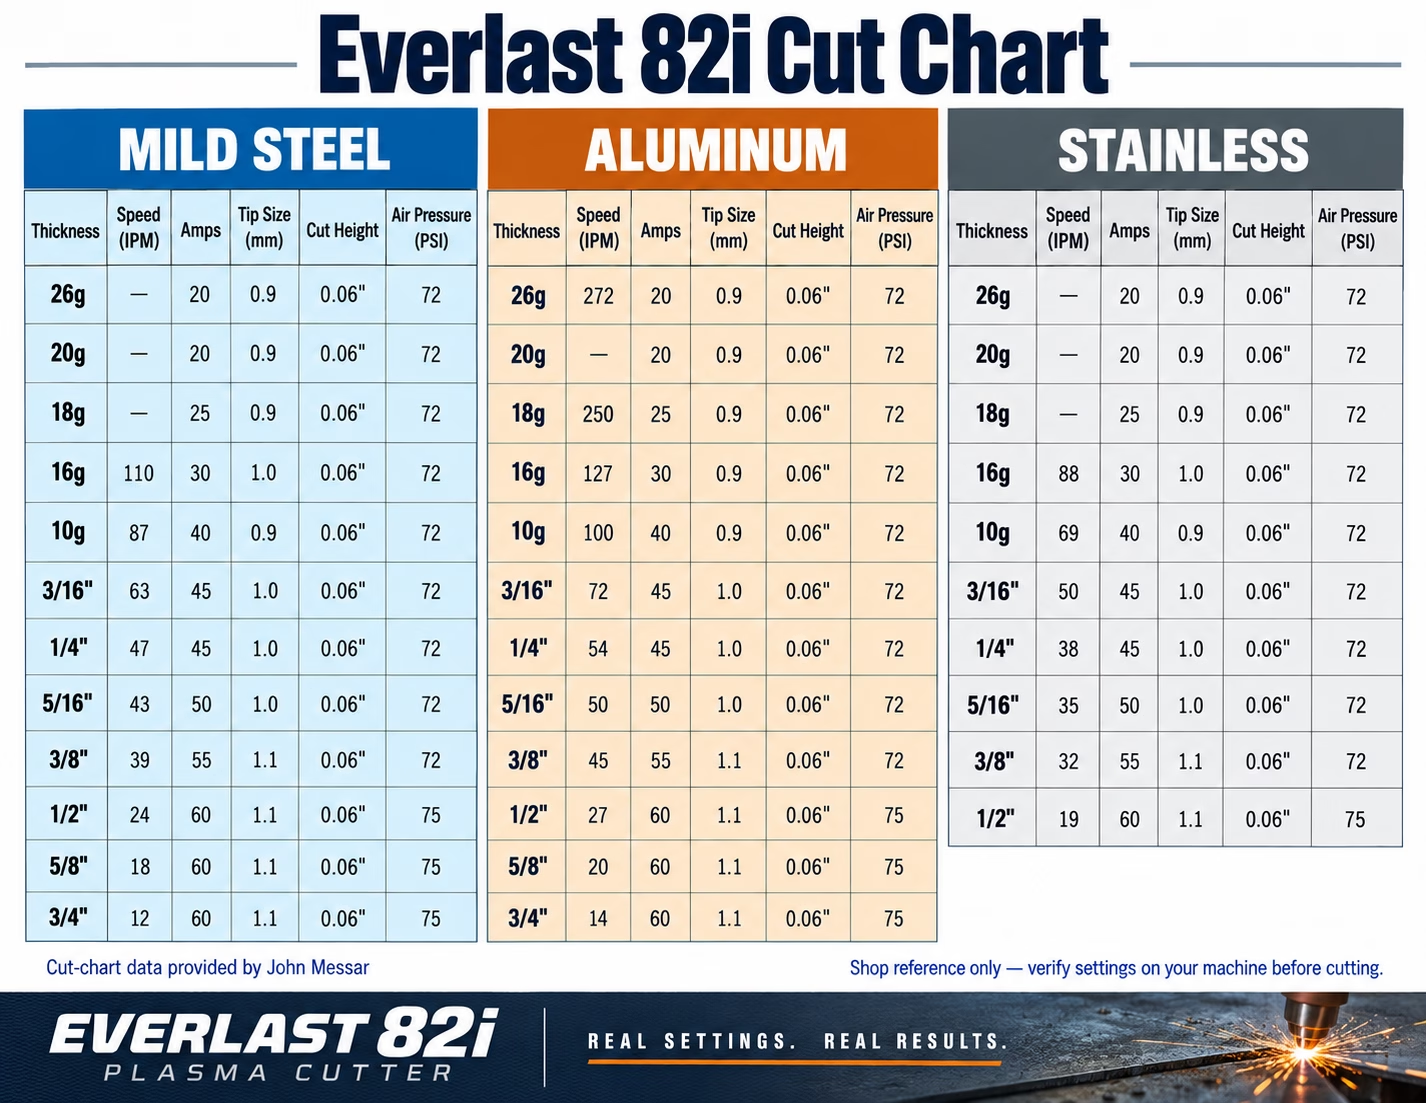
A good cut chart should be your starting point.
Depending on the plasma cutter, it may specify:
- Material type
- Material thickness
- Amperage
- Tip size
- Cutting speed
- Pierce height
- Cut height
- Air pressure
- Pierce delay
Start with those settings before experimenting.
Then make small adjustments based on what the cut is actually telling you.
If you immediately start changing amperage, speed, torch height, air pressure, and THC settings all at once, you lose the ability to identify which setting caused the improvement—or made the problem worse.
Torch Height Still Matters
Even perfect amperage and speed settings will not compensate for incorrect torch height.
Cut height directly affects the shape and behavior of the plasma arc.
If the torch is too high, the arc spreads before reaching the workpiece. If it is too low, the consumables can be exposed to additional heat and molten material.
This is also why pierce height and cut height are different settings.
The torch normally pierces higher to protect the consumables, then moves down to the proper cutting height after the material has been penetrated.
For a deeper explanation, see:
Pierce Height vs Cut Height: Why CNC Plasma Uses Two Different Heights
Correct height also depends on accurately finding the material surface. Our article on How the Floating Z-Axis Sets Torch Height on a CNC Plasma Table explains how that process works.
Don’t Blame the Cut Chart Until the Machine Is Mechanically Correct
Before changing cutting parameters, make sure the problem is actually coming from the plasma settings.
A torch that is not square to the plate can create bevel even when amperage and travel speed are correct.
See:
Why CNC Plasma Torch Squareness Matters for Cut Quality
Torch movement can also affect actual cutting height.
If the torch lead becomes tight near the end of the gantry travel, it can pull on the floating Z-axis and change the physical torch position.
That is covered in:
Why Torch Lead Routing Matters on a CNC Plasma Table
The basic rule is simple:
Get the machine mechanically correct first. Then tune the plasma process.
A Better Way to Troubleshoot Cut Quality
When a cut does not look right, work through the variables systematically.
First verify:
- Correct consumable and tip size
- Correct amperage
- Correct cutting speed
- Correct cut height
- Correct air pressure
- Torch square to the plate
- Consumables in good condition
Then change one variable at a time.
If the cut is producing dross, for example, do not immediately change speed, amperage, and torch height together.
Make one adjustment, cut another test piece, and compare the result.
That approach may take a few test cuts, but it gets you to the correct setting much faster than randomly changing numbers.
The Bottom Line
Amperage, tip size, and cutting speed are not independent settings.
They are three parts of the same cutting process.
The tip controls and constricts the arc. Amperage determines how much energy is available. Cutting speed determines how long that energy is applied to the material.
When those three are matched correctly—and the torch height and mechanical setup are right—a CNC plasma cutter can produce remarkably clean and repeatable parts.
Start with the manufacturer’s cut chart, verify the machine setup, and make small controlled adjustments from there.
For more CNC plasma setup and troubleshooting articles, visit the Beck Tools CNC Plasma Guides.
